Using WaterBorne ® Air Dry Doll Paints
Thank you for buying WaterBorne Paints®, developed at HunnyBuns Dolls & Reborn Supply by Master Artist
Stephanie (Sullivan) Tackett. Since 2013, WaterBorne Air Dry Paints have been taking the Reborn World by storm! From Beginners to Master Artists, WaterBorne is the most economical and easiest to use of any air dry system! And I'm here to help every step of the way.
-Nontoxic, non-fading, flexible colors & mediums created from premium art grade pigments & ingredients.
-Beautifully translucent colors! All products come in several affordable sizes for your convenience and to suit
your budget.
-Full support from Master Artist Stephanie S. Tackett (email: hunnybunmama@gmail.com)
Join us on Facebook by asking to join The Art & Magic of Reborning.
Debbie Henshaw was a big help in developing these paints. The results can be seen on her blog: www.
theynevergrowupnursery.blogspot.com/2012/11/art-and-magic-water-borne-air-dry.html Please note that
WB paints, mediums, and the techniques have evolved a bit since she wrote her blog about them. April Yap
and Angie Jones both helped with ongoing research and development (very much appreciated!).
FIRST STEP: Wash all doll parts in hot water and dish detergent, & dry thoroughly. You MUST PREP the vinyl
(and baked polymer clay sculpts) BEFORE PAINTING! Critical first step...do not skip it. Without a proper prep coat on bare, clean vinyl, the paint may bead up and won’t stick permanently.
No amount of “sealing” the paint will work if the paint isn’t sticking to the vinyl in the first place. Vinyl is a petroleum product, and WaterBorne™ is a water-based product, and oil and water don’t mix, so we must ensure full adhesion of the paint to the surface. WB Clear Base Primer does this.
MATERIALS & SUPPLIES YOU'LL NEED:
1. Art & Magic WaterBorne Paints™ sold by the set or individual open stock bottles in various sizes.
2. WaterBorne Clear Base Primer: Apply straight from bottle with a smooth cosmetic sponge. IF it gets too
thick, you can thin slightly with distilled water. It will look a bit shiny as it dries and may feel a little sticky.
This is NORMAL. Both will disappear as you add paint layers.
3. WaterBorne Slo-Dri slows down evaporation of the paint ON the doll as well as in the palette. You can
add up to 50% of this medium to the paint to increase transparency and work time.
4. Flow Medium: This medium can be used in addition to -or instead of - water to thin the paint without
breaking the pigment-binder bond. I highly recommend it!
5. Ultra Matte Sealer: Seals the paint, and provides a more matte finish. Pounce on with a smooth cosmetic
sponge in a very thin layer, not leaving any bubbles. Dry for minimum 24 hrs. It also makes a fine base coat, if you run out of primer.
6. Adhesion Additive: this is an optional medium that is useful if you have one of those doll kits that the
paint seems not to adhere properly even with Priming. Sold separately.
7. Any type of dish or well palette (plastic is fine).
8. Distilled or purified water ONLY - not tap water.
9. Sponges: cosmetic wedges and natural sea sponges or cellulose sponges torn into small pieces about 2
inches across. My honeycomb sponges are awesome!
TRANSITIONING FROM GENESIS HEATSET PAINTS? First, the "Good News": No heat needed. Paints dry
within a few minutes. Allow about 3-5 minutes between layers. Apply one layer of paint at a time and try
not to over-paint it immediately in order not to muddy up your color layers. It takes several hours for a fully
painted doll to dry, depending on humidity. Sealing & rooting can take place after this.
Then the “Bad News”: You’ll need brushes not used for Genesis Heatset Paints (or any type of oil paint) –
or make sure you’ve washed them very thoroughly with dishwashing detergent so that no oil residue
remains in the brush. If you’ve been using Genesis ® Heatset Paints, you’ll find that mixing the colors is similar. I designed the Pre-Blended Doll color range to approximate the colors we are used to in GHSP.
Application and color blending is similar. For experienced artists who prefer to blend their own palette, I offer Basic Colors and Tinting Colors sold individually. Find GHSP to WB transitional color charts at HunnyBuns Reborn Supply.
There is now a Master Set which contains every product in the WaterBorne ™ line.
BASIC PAINTING INSTRUCTIONS: WaterBorne paints are concentrated and intended to be thinned with
purified or distilled water, Flow Medium and Slo-Dri as needed. Begin painting the doll after the Clear Base
Primer has dried to the touch.
Diluting WB colors: Use as many drops of water/Flow Med./SloDri to each drop of color as you need to
achieve a transparent layer of paint. This varies with every artist and the techniques they use and what they
are trying to achieve.
Each artist will develop their own dilution technique as they get a feel for using WaterBorne paints.
REMEMBER THIS IS ART, NOT CHEMISTRY :)
To avoid paint drying out inside the bottle, re-cap quickly. Since these are water-based paints,
store leftover paints in airtight jars or simply rinse your palette after each use.
Basic Flesh Layers: Start with 2-3 drops of Light Flesh and dilute with Slo-Dri and several drops of water.
Add Flow Medium. This should give you a translucent wash of color. If it's too concentrated, dilute with
another drop or two of water until you get the right consistency. I like to alternate Light Flesh layers with
Darker Flesh layers to give depth. I normally use a mottling (honeycombed) sponge for both colors.
Blushing: Start with 2 drops of color and dilute to create a translucent wash. Adjust as needed to get light
coverage and mottling.
Veins: 1 drop color to 6-8 or more drops of water/Flow Med./Slo-Dri. You want a visible line of color that is
not too dark. Adjust as needed. Gently pounce the color until it looks just like veins below the skin.
Undertone color washes and color correction: (mint green, creamy yellow or purple undertone wash):
Several drops of paint to as many drops of water as it takes to get a transparent wash of color. You can use
the Vein Blue for a wash, too. Test before applying to vinyl.
Nailtip/Milia: use straight from the bottle (also can lighten other colors). A super thin brush works best.
Creases & Capillaries: 1 drop of paint to however many drops of water/Flow Med./SloDri as it takes to get a
visible, easily blended line of color, similar to veins. Adjust as needed.
Dark Flesh,Brow & Hair: Use straight from bottle if painting hair, or dilute to get slightly less-intense
color. If using for all over skin tone, dilute the color until it gives you the depth of color you need on the
vinyl. Test it on an inconspicuous part of the bare vinyl).
Apply all colors with a torn cosmetic sponge, honeycomb sponge or brush depending on the effect you want.
CUSTOM COLOR BLENDING EXAMPLES & COLOR CORRECTION:
· Blending Other Flesh Tones: To get Asian Flesh Color, add a couple drops of Creamy Yellow to Light Flesh.
Add a touch of Basic Brown or Dk Flesh, Brow & Hair color to the Darker Flesh to darken further.
Medium Dark Flesh color makes a good pre-blended darker skin color base. Darkest of all is "Darkest Flesh".
· Medium Flesh: mix the Light and Darker Flesh together. Want darker? Add a drop of Dk Flesh, Brow & Hair.
· If you have too-pink vinyl to begin with, OR if you over-blush a doll, a wash of Redness Correcting Tint will
help. Some use it as an intermediate wash of color to add depth.
· If you get a doll too purple or blue looking, make a thin wash of the Creamy Yellow and go over the doll
with it to cut the purple or blue tint.
· To achieve a realistic baby-skin mottle, use a thinned down wash of Lip/Blush/Nail color on a
honeycomb spongeor specially prepared cosmetic sponge and dab (pounce) lightly all over. Add more in places a baby has more color.
Any WaterBorne color can easily be mixed with others to achieve the most creative and natural results.
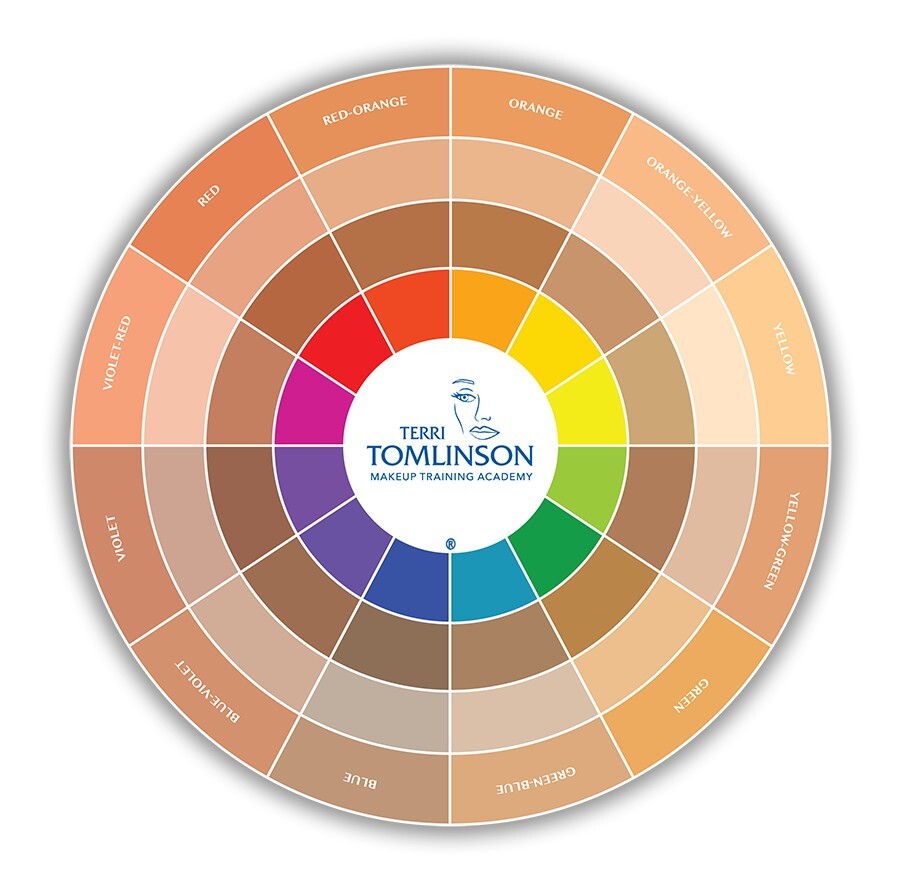
Familiarize yourself with an artists color wheel to understand how to mix and blend colors. I designed a
new Reborn Artist's pastel shade color wheel seen below, and also available on www.hunnybunsrebornsupply.com in the Free Downloads section of the Main Menu.
WB paints dry fast, so if you need to wipe them off or rework any layer, work quickly with a wet brush,
sponge or swab. It will come off. As it dries it becomes permanent. Add Slo-Dri medium to slow down
drying time.
If you really mess up, original formula (new formula won't work) Winsor & Newton Brush Cleaner will
remove all layers of WB paint down to bare vinyl. This may be unavailable in your area, so pure rubbing
alcohol or acetone will also work. Be very careful using acetone. Gently swipe the color off with a
cottonball. If you rub too hard, you will end up sort of polishing the vinyl and the new paint won't stick
well.
WHEN YOU ARE FINISHED PAINTING, EXPERIENCE HAS SHOWN IT IS BEST TO LEAVE THE FULLY
PAINTED DOLL TO DRY FOR 24 HRS BEFORE INSERTING EYES OR ROOTING THE HEAD OR ASSEMBLING.
This tutorial can be downloaded (in slightly larger font, and easier to read spacing) from my Home Page at
www.hunnybunsrebornsupply.com (contains clickable links) or from our Facebook Group The Art & Magic of
Reborning - ask to join, we'd love to meet you and help you be successful using these paints.
Want more information and step by step guidance? Use coupon code AAM3 at checkout to get
a 10% discount on purchase of my book "The Art & Magic of Reborning III, Rev 3 Creating
Lifelike Collectible Baby Dolls Using WaterBorne™ Air Dry Paints" I sincerely wish you success!